
Unfortunately, Blu-ray discs aren't supported by default in our favorite media center application, XBMC. Sure, you can rip Blu-rays, but that takes forever, and you want to watch it now. Here's how to can enable Blu-ray playback in XBMC. More »

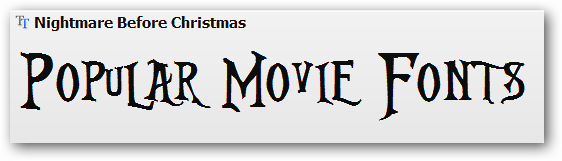
Many of our favorite movies have awesome text styles shown in the credits and would definitely be fun to have on our systems. Today we have a terrific collection of popular movie fonts for you to look through.
Note: To manage the fonts on your Windows 7, Vista, & XP systems see our article here.
TRON

ROBO

Planet Of The Apes

Back To The Future 2002

Highlander

Belials Blade
*includes five font types

Blade 2

Jurassic Park

The Sixth Sense

Twister

Metrolox (Enemy of the State)

Impossible

The GodFather

Ghostbusters
*Ghostbusters logo appears with capital “O”

ActionIs (Austin Powers)

Nightmare Before Christmas
Goonies

Narnia BLL

A Bug’s Life
*includes two font types

The Incredibles

For more great ways to customize your computer be certain to look through our Desktop Fun section.


Check out the new Switched! originally appeared on Engadget on Fri, 20 Aug 2010 00:30:00 EDT. Please see our terms for use of feeds.
A couple of enhancements in Word 2010 & 2007 is the Mini Toolbar and Live Preview features. While these enhancements are welcome by some, other users may find them annoying. Here is how to turn both features off.
Mini Toolbar and Live Preview Features
The Mini Toolbar pops up when you select text in a document. It allows you to change fonts, underline, bold, italicize the selection and more.
![sshot-2010-08-14-[02-14-33]](http://www.howtogeek.com/wp-content/uploads/2010/08/sshot20100814021433.png "sshot-2010-08-14-[02-14-33]")
Live Preview allows you to hover the mouse over different style types and instantly show you how the document will look with the changes.

Disable Mini Toolbar and Live Preview in Word 2010
If you are annoyed by the Mini Toolbar and / or Live Preview while creating documents, we can easily disable one or both. In your Word document click the File tab to access Backstage View and click Options.
![sshot-2010-08-14-[02-20-01]](http://www.howtogeek.com/wp-content/uploads/2010/08/sshot20100814022001.png "sshot-2010-08-14-[02-20-01]")
Click General and under User Interface Options uncheck either Show Mini Toolbar on selection, Enable Live Preview or both then click OK.
![sshot-2010-08-14-[02-20-48]](http://www.howtogeek.com/wp-content/uploads/2010/08/sshot20100814022048.png "sshot-2010-08-14-[02-20-48]")
You don’t need to restart Word, the features will be disabled right away. Now when you highlight text, no annoying Mini Toolbar…
![sshot-2010-08-14-[02-21-35]](http://www.howtogeek.com/wp-content/uploads/2010/08/sshot20100814022135.png "sshot-2010-08-14-[02-21-35]")
And when choosing different Style Sets or other configurations of the document it will no longer show you how it will look with Live Preview.

Word 2007
You can disable both features in Word 2007 as well. Click on the Office Button the Word Options.
![sshot-2010-08-14-[18-37-48]](http://www.howtogeek.com/wp-content/uploads/2010/08/sshot20100814183748.png "sshot-2010-08-14-[18-37-48]")
Under the Popular section just uncheck the Mini Toolbar and Live Preview boxes.
![sshot-2010-08-14-[18-38-31]](http://www.howtogeek.com/wp-content/uploads/2010/08/sshot20100814183831.png "sshot-2010-08-14-[18-38-31]")
If you’re moving from Office 2003 to a newer version, you might find the new features to be quite handy, on the other hand, you might find them very annoying. If so you can easily turn them off, or if you want to use the features again, just go back and re-enable them.
TUAWi(Pad) of the Tiger originally appeared on The Unofficial Apple Weblog (TUAW) on Thu, 12 Aug 2010 10:00:00 EST. Please see our terms for use of feeds.
A Guest Post by Pamela Aurino.
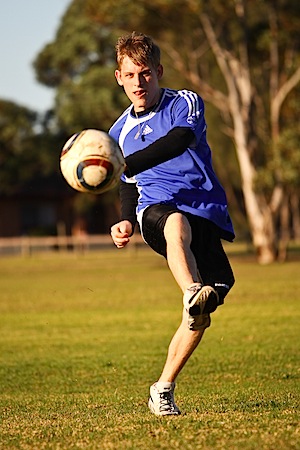 When shooting any sports, make sure your camera is set to burst/continuous mode to keep up with movements of the players. This will save you having to press the button manually for every shot. Have your camera’s focus mode to AI servo mode which is made to shoot continuous movement & for panning.
Also ensuring all your focal points are active will make sure you have optimum chance of focusing on the player with the ball. When shooting sports it is ok to have the camera in Aperture Priority mode as we’re dealing with a really fast game and you need to be on the ball with exposure rather than having to always toggle the shutter speed manually.
I personally shoot in jpg as opposed to RAW. When you’re taking so many continuous shots you’re going to want a maximum buffer speed. You’ll find when shooting soccer / netball tournaments, the parents buying the shots aren’t going to be too fussed on quality of the image as long as you captured something at the right time. A sporting tournament can get quite messy when you’re coming out and back off the field to download CF cards and you’re having to wait for the raw files to download.
You’re going to need a fast telephoto zoom lens when photographing sports. I shoot with a Canon 70-200 f/4 IS USM and I love it! Although indoor sports photography like bowling may require a 2.8 lens as you get another full stop of light in.
An absolute MUST when photographing sports photography is to have IS on your lens. You want to set your lens to Image Stabiliser Mode 2. Mode 1 is only made for still subjects & portraiture and won’t perform as well as the panning mode 2 in sporting situations.
Have your focusing distance range set to 3m to Infinity mode instead of 1.2m to Infinity. This will make sure you have the fastest focusing possible.
 Soccer games usually run in the morning so if you’re aiming to sell prints after the game of the individual players be sure to spread out the range of players shot. There are certain players who like to step back more than others but it’s your responsibility as the photographer to record everyone and to maximise your profits.
Take note of where the sun is and make sure the sun is to your back when shooting. This will ensure you have your shutter speed on it’s maximum without having to worry about exposing for the faces of the players if you were shooting into the sun. I am willing to sacrifice a little squinting and panda eyes from the players to ensure I get the right exposure. After all if you don’t nail that exposure no one is going to care about panda eyes because there won’t be a shot.
Concentrate on shooting one team for the first half as they will be in the right position with the sun illuminating their fronts/faces. Then when half time is over aim to shoot all the players on the other team as they would have switched sides on the field.
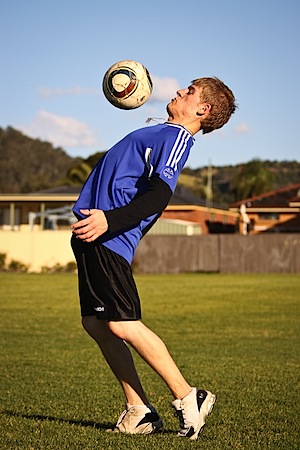
When photographing sports, the key rule is to include the eyes of the subject and you can never fail. If you’re shooting the back of a player, STOP! ..Wait for them to turn around (or turn to another player on the field) ..and shoot when you have their eyes in the shot. The best shots in soccer are the headers and knee shots, as their eye level will typically be above parallel to the ground which is what we want. Whatever you do, don’t forget to photograph the goal keeper! He/she doesn’t have much interaction with the entire game, but the anticipation shots in between can still make great shots.
The eyes and the ball are two of the most important compositional elements in a shot. Then to add to the shot is the expression in the players face.
Although it can be difficult to capture, parents of the players are more likely to buy a picture that includes the game ball in it.
Make sure you wear a big yellow/orange vest to indicate to people you are the official sports photographer. A photographer in Wollongong, NSW taped a sign on his back saying ‘Request A Shot!’ and at least that indicates to them that they are welcome to pull you aside. If you are more open to people nagging you, (yes it will be a little annoying having to be pulled aside with parents saying ‘look out for my son, number 12!’) the more sales you will make from prints.
See more of Pamela’s work at http://www.elaphotography.com.au.
Post from: Digital Photography School - Photography Tips.
Tech lover Chris Oldroyd explains how to uses AirVideo with his iPad and Windows Home Server.
Chris describes AirVideo as the best application he has ever bought for the iPhone and iPad and describes how it helps integrate his iPad with his home entertainment setup. By installing the small server application directly on Windows Home Server and the Apple app store app AirVideo on either an iPod or iPhone you can have video streaming from WHS to either of these devices when you are out or about.

Chris goes through the setup steps here.

![]()


