We've shown you how to bring the OS X GUI to Windows, but if you're more of a Linux fan, Macbuntu will add an OS X theme to your Ubuntu desktop instead. More »


 "
"
"
"
This post is the 2nd in a 2 part series by Tony Page from Travel Signposts and author of Guerrilla Travel Photography. See part 1 here.

Lac Brienz, Switzerland. I used my wife, Helen, to provide a splash of accent colour and point of interest to what would otherwise have been a peaceful, but basically boring scene (guerrilla travel photographers always employ all the resources at their disposal...). Now it has a story to it, an emotional component.
Don’t Forget the Foreground
Want a killer landscape shot? Make sure you’ve got a striking foreground. Now in most cases, the foreground will not be the main subject of your image, and really serves as a kind of frame to emphasise the depth of your composition. One of the big advantages of using an ultra wide angle lens is the dramatic perspective you can get between a relatively close foreground and the rest of the scene while still keeping everything sharp. But you can still use this principle even if your lens is not so wide, although you have to be more careful about depth of field — stop down!
And Don’t Forget The Other Two…
The best landscape photographs have clearly a defined foreground, middle ground and background. I’ve emphasised the foreground because that’s the one that people usually miss out when they’re taking photos of an impressive landscape. Everyone usually gets the sweeping background, that’s often the first thing that strikes them when they look at a scene. But it’s equally important to have a strong middle ground to avoid a feeling of emptiness in the centre of your shot (unless that’s what you want, of course, the middle ground in the shot above is deliberately empty to emphasise the feeling of expansiveness).
So you’ve got a foreground, you’ve got the middle ground, and you sorted out a fine background. Okay, what’s your photo about?

Monet's Lily Pond at Giverny, France. There are several visual elements in this image which draw your attention, but there's no doubt what the photo as a whole is about.
Well, what’s your photo about?
“Er, er, well, it’s a landscape shot, in Spain, I thought it was quite pretty…”
Dong! Sorry, wrong answer, you fail, you are the weakest link, goodbye!
With landscape photos, it’s quite easy to take a technically competent photograph about nothing. Attractive wallpaper. Don’t let this happen to you. The landscape in front of you may be beautiful, but you must have a focus to your picture, a clear subject so that anyone looking at your image can instantly say “this is a shot of a mountainous forest landscape in the Ardennes” or “this is a viaduct spanning a valley in Yorkshire” or the like. All right, they don’t have to be able to tell that it’s in the Ardennes or in Yorkshire, but you get my drift.
Your subject can actually be the light itself, “shafts of sunlight breaks through the storm clouds onto the fields”, or the weather, “a heavy downpour streams down the mountainside”, just so long as the subject of your photograph is clearly evident. If the person looking at it has to think twice about what your image is about (we’re not talking about your interpretation of the subject), it’s not strong enough.
When you’re shooting groups outside in sunny weather, even with friendly light, you may find it difficult to get the lighting right on everyone’s face. In harsh midday light, it’s even harder! The best way to solve this problem is to turn everyone round with their backs to the direction of the sun, and use fill-in flash to balance the light. The same goes for shooting inside, with awkward artificial lighting. Of course, you’ll come in relatively close and the light source won’t be included in the picture.
Get Them Up Close and Personal
When you’re doing a shot like this, when the emphasis is on the people in the photo as opposed to the surroundings, make sure that you get everyone to really squeeze together, especially their heads. Preferably, their heads should be virtually touching. Although they’ll feel strange, and it may cause a few giggles, you’ll find that the result will be immeasurably better than if you leave them to pose at the distance they themselves would normally select. Try it, you’ll see what I mean. It helps to break the ice and get a relaxed shot, too!
Make Them Look Up To You
Another trick I’ve found useful, especially when the group is quite sizeable, is to shoot from a higher viewpoint and get everyone to look up at you. You don’t have to get up too high, maybe a nearby low wall or a few stone steps, or if inside simply stand on a chair. This is helpful in avoiding people blocking each other, because you can be sure that later everyone will be looking for his or her own face!
Keep Up the Chat
As with individuals, always remember to keep talking when you’re photographing groups. You have to keep them amused and happy — it doesn’t matter if they think you look or sound stupid, as long as you get the shot.
Close-Up Food Shooting
Food shots make great memories, but not many people remember to take them! When you’re shooting your close-ups with a point-and-shoot, don’t go too close to the food, and pay especial attention to this when you’re sitting at the table, or you’re liable to burn out your highlights. You want to use your zoom to frame the plate tightly, so if necessary stand up. Another way to do this is to photograph the plate of the person sitting across the table from you. If you have a diffuser on your camera flash, this will help no end.
Although I like to have as much of the food in focus as possible, you’ll often find that you are shooting at large apertures, which coupled with your use of zoom leaves you with quite shallow depth of field. Actually, this is currently very fashionable in professional food shots, just make sure that the first food element is in focus and let everything beyond the back of the plate (or closer) go soft. If you’re using flash, and find you have too much depth of field, just use a bigger aperture (f/2.8 is good) to get the desired effect.
Brand Your Shots
Take at least one shot that uses the branding devices employed by the restaurant or cafe to show where you are. These can be menus, paper napkins, coasters, plates, coffee cups or even sugar sachets with the establishment’s name on them. Just incorporate them into your composition.
You can also get good shots of “local” dishes at buffets; there is usually a wide range of food and the situation is often more relaxed. The arrangement and decoration can also provide interesting elements if you’re lucky.
Red Wine Trickery
Here’s an old pro tip about shooting wine. Red wine is always too dark in photographs as it is, so as you’re not in the studio, the easiest way to get over this is to — shock, horror — dilute it with water. You should easily be able to see your finger through the glass.
The Golden Rule of Shooting Food in Restaurants
Now if there’s one golden rule when you’re shooting food in restaurants or cafes, it is to BE QUICK! One very good reason for this is because you obviously want to shoot the food before you start eating it, and hungry people tend to get impatient when delicious fare has been placed in front of them. So get an idea of the way you’re going to compose your shot before the food arrives. If I’m honest, there have been some occasions when I’ve joyfully tucked into my food, before realising a little too late that I had meant to photograph it…
The best time to shoot night shots is at twilight. At that time, the sky still has some blue in it and the city lights have already come on. It’s obviously best if you use a tripod and cable release, as this opens up a whole range of shots to you that would be impossible without it. If you haven’t a tripod with you, you’ll have to make use of walls, lampposts and other supports, because the exposures will certainly be slow, unless you’re shooting brightly lit shop windows and the like.

Edinburgh Castle lit up for the famous Annual Tattoo. A slow exposure, 1/10 second, handheld but resting my elbows on the seat in front.
Exposing At Night
City Skyline: Don’t Burn Out
The tricky thing with night shots tends to be the exposure. If you’re taking a shot of a city skyline, simply taking an overall exposure reading will probably overexpose your shot, as the large expanse of dark areas will fool your camera into burning out the highlights. So in this case, you’re probably going to have to use exposure compensation to reduce your exposure a little. Fortunately, since you’re not paying for film and can check things immediately on your LCD, you can adjust your image to your own taste.
By the way if you are taking a skyline, if you can get a river or other stretch of water in front of it, you’ll get some great reflections that can really lift your shot. This also goes for decorative pools in front of floodlit statues or other tourist sites.
Bright City Lights
On the other hand, if the city lights and brightly lit areas are closer and you point your camera at them, it’s almost certain that your shot will be underexposed as your camera will work out the exposure based on those highlights. Try focusing slightly off to one side of the lights and use that exposure. If this doesn’t look good, you may find you have to increase your exposure compensation by +1 or +2.
[CAPTION: Traffic streams along the river freeway outside the Kremlin in Moscow. Taken from inside a coach, you can see the bus clock at the top left, on a Nikon E995 (yes!).]
White Night Balance
As far as your white balance is concerned, you’ll have to experiment. Surprisingly, I’ve found that the auto setting on my Nikon and Canon often produces acceptable results when shooting at night. You can have quite a mix of light in your shot, and although you might start with an incandescent setting, this won’t necessarily get you the best results. I’m often glad to be shooting in raw format!
You should note that sodium lights (orange) and some mercury vapour lights (bluish white) produce an incomplete spectrum, so cannot be properly filtered or balanced to give true colours; fortunately you see less of them of late (the use of mercury vapour lamps for lighting purposes will be banned in the European Union in 2015). Nowadays, halogen lights are popular for shop window displays, and you’ll frequently get a good result on your auto setting.
That’s all I have space for here, but please share your own experiences and tips below. In any event, I hope I’ve encouraged anyone who ever thought “these travel techniques are all very well, but I simply would never have the time for them” to realize that they’re not alone, and that there are other ways of photographing on the road.
Cynics have said those who can, do, and those who can’t, take photographs. Guerrilla Travel Photographers believe that on holiday you can do both.
So, lock and load, and good shooting…
Tony Page is a professional photographer and writer. View his work at Travel Signposts. Tony has just launched his new eBook – Guerrilla Travel Photography with a special discount for dPS readers this week.
Post from: Digital Photography School
If you have too much media in your collection that you want to access remotely, sometimes even the largest size iPods won’t do. Here is how you can use ZumoCast to access your entire digital library from virtually anywhere.
ZumoCast is a free and easy to install service and utility that allows you to access your entire digital media library from virtually anywhere. With a few simple steps you’ll be able to stream your digital collection from home to your iOS device over Wi-Fi, 3G, and any Windows or Mac computer connected to the Internet.
For this article we ran ZumoCast on Windows 7 Home Premium 32-bit and used an iPod Touch 4th generation iPod Touch over Wi-Fi on a local network.
Getting started is extremely simple. First download and install the ZumoCast software on each PC or Mac you want to access (link below). Installation is quick and easy following the wizard and accepting the defaults.
After installation, you’re prompted to create an account if you don’t have one yet.
After signing up for your ZumoCast account, you can select the media you want to access. By default your local Music, Videos, Pictures, Documents, and Desktop is selected. Then you can add any other folders you want.
It’s worth noting that it works with external drives and network locations. We were able to access terabytes of digital media from our Windows Home Server. This is nice so we don’t have to install any extra software on the server.
The ZumoCast icon lives on your Taskbar. Right-click it and go into Preferences or go to ZumoCast Web Access – more on that below.
In Preferences, click on Manage Content to add or remove folders you want to access.
In settings there are a few options to change its behavior. You might want it to always launch during startup so you know you’ll always have access to your media while away.
Now it’s time to install the ZumoCast iOS app…which is free…to your iPhone, iPad, or iPod Touch either from the App Store via iTunes or directly from your device (link below).
After it’s installed on your iOS device launch ZumoCast and you’ll be greeted with a welcome screen.
You’ll be prompted to sign up for the service if you haven’t already, but since we signed up when installing the desktop app, tap the Sign In button.
On your Home screen you’ll see a list of computer(s) that you have the desktop app installed on and content that you’ve downloaded to your iOS device. Like in this example where we have three different PCs we can access.
![sshot-2010-10-06-[02-23-43]](https://lh3.googleusercontent.com/blogger_img_proxy/AEn0k_v49YNfb8s8N2kua1JRSMVGdkcuNqkRju8jhOiDIWSWDJH8UDYRzUpUK4ttt3XsJsR3nXes3LqJY-9PoOfEK0y92MZIlV8HP7LOO_gZEXp4weni7fTfQOIAsSgL9BOitAA40Go9BVHi1JXHys_r2kyy5z1b=s0-d "sshot-2010-10-06-[02-23-43]")
Now we can browse through all the folders we added when installing the desktop software.
Here we are accessing an MP3 that is on an external drive connected to our computer. You’ll have the option to play the tune or download it to your device.
Here we’re streaming some music from our collection from the home PC on our iPod Touch.
Provided you have the correct metadata and artwork, it’s displayed while you’re listening to your favorite tunes.
Over our Wi-Fi connection there was little to no lag time when playing a movie from our collection.
You can also access your office documents as well. You can download them to your device, or read them. If you’re in a pinch and need to get a document easily from another computer, this works very well.
Here is an example of displaying a MS Word document…
Or viewing a PowerPoint presentation.
Not only can you access your collection from an iPhone, iPad, or iPod Touch…but also from any computer through your browser. Like with the iOS app you can browse and play your music files.
Watch your video and movie collection.
You can access everything in you collection including movies, documents, music, and pictures…just like with the iOS app. When we tried it from another computer which wasn’t on our local network, there was some buffering time before music and video would play, but that is to be expected.
We weren’t able to test it out over 3G for this article, but we’ve read good things about it. If you’ve tried it over 3G on your iPhone or iPad leave a comment and let us know.
You might need an important document in a pinch, or have access to your pictures, music, and video from anywhere. Maybe you only have an 8GB iPod Touch and Terabytes of digital media you want to access from your iOS device or another computer. There are a lot of ways where ZumoCast can be useful! Instead of having the hassle of syncing your digital content through iTunes on your computer, ZumoCast makes it easy to stream anything no matter where you are.
Download ZumoCast for Mac or PC
A Guest Post by Tony Page from Travel Signposts.
You know, as a Guerrilla Travel Photographer I often find myself thinking that some people who give us advice about taking photographs when we’re traveling need a reality check.
Okay, a lot of their advice is fine in an ideal situation, but the problem is we’re usually not in an ideal situation. There’s a lot of difference between the ideal when you’ve got plenty of time and the reality when you haven’t, and people don’t place enough emphasis on the latter.
Most of us are forced to be Guerrilla Travel Photographers by necessity. We can only fantasize about having all the time in the world to think about our shots, to wait for the right light, to choose different viewpoints, to have cooperative and colourful model talent, to try different technical approaches, all with a supportive crew behind us to carry our bags, bring us cool drinks, and mop our brow.
OK, I’m exaggerating, but you know what I mean. In the words of an immortal Australian,
“Tell ‘im he’s dreamin’!”
For most of us, although we love taking photographs when we are on the road, it is not the only thing competing for our attention. Lots of us have significant others, children or friends who while appreciating our hobby, are not committed to it in the same way we are. So we have to take our chances when we can, “seize the moment” and take advantage of any opportunities that come our way. We have to be Guerrilla Travel Photographers.
Let’s have a bit more photographic how-to advice with an aggressively practical spin, that starts off with the assumptions that the light’s wrong, the subject’s difficult, we don’t have any time and we’re not using the latest and greatest gear. Sound familiar? Because that’s the likely reality for most of us.
And that’s what this post is all about …travel photography in a real world! In this and tomorrow’s post, I’ve put down a few guerrilla travel photography basics that I hope will start you thinking. And if you’ve got a few tips that will help, please share them in the comments. Good shooting!
It’s always worthwhile finding out something about the places you’re going to travel to before you leave home, whatever your reason for taking photographs. Obviously, you’d have to do more research if you were going to write a feature about the destination, but even if you are just travelling on holiday, getting some idea of the kind of things you might be photographing can be very useful and save a lot of time.
Where to Get Your Information
You already know the broad outline of places that you will be visiting, but you may have some flexibility as to the time. If so, it’s a good idea to check whether there are any festivals or special events going on at your destinations; these can often provide rewarding photo opportunities. Look up the local tourist boards on line, they often have calendars of events many months in advance, and travel websites frequently highlight upcoming festivals and other points of interest.
Even if you are not going on an organised tour, it can be worthwhile to check out tour itineraries covering the places you’re visiting: they will give you a good guide as to potential tourist sites and activities in which you may be interested. For Europe, have a look at Insight Tours, Globus and Trafalgar.

Gondolas near St Mark's Square, Venice. Visit the Tourist Office, it's just to the right of this shot. Photos like this from Travel Signposts give you an idea of what's available to shoot.
Get a Sneak Preview Before You Go
It’s also helpful to have an idea of what things look like before you’re standing in front of them. Get some ideas of what other photographers have thought was interesting by looking up your destinations on the big stock sites, like Getty or Corbis. Some travel websites also have galleries of photographs that can be helpful; for example, Travel Signposts has over 23,000 images of European and Mediterranean subjects designed to show you what places are really like, as opposed to simply glamorizing them.
I’m not suggesting that you copy these shots, but they will give you some idea of the different viewpoints and interesting features of your potential photographic subjects. This will really save you time when you finally get there, and as a guerrilla travel photographer, time is one of your most valuable commodities.
Before we get any further, let’s put another myth to rest. Some photographers seem to have a sort of macho belief that if you don’t use manual settings somehow you aren’t a REAL photographer. What a load of old cobblers! The only time I use manual settings is when I can’t get the camera to do what I want automatically. In many cases, I am quite happy to let the camera do the calculations while I concentrate on creating the image.

Fish outside a Bosphorus restaurant, Istanbul, Turkey. Canon Ixus 400, automatic flash.
Don’t Be Scared Of Auto Modes
Although a point-and-shoot camera is more limited when it comes to shooting modes, for example aperture priority or shutter priority, careful use of the various screen modes provided can help you get your shot. I rarely use only manual settings on my DSLR, tending to leave the camera on shutter priority for casual shooting, to minimise camera shake and freeze subject movement.
I also make use of the program mode; many people don’t realise how flexible this can be. With Nikon cameras and many others, if you don’t like the particular aperture/shutter combination selected, you can simply adjust the exposure value by dialling in the aperture or shutter speed you fancy and the camera will adjust the exposure accordingly. No need to switch to aperture or shutter priority at all.
Learn To Use Exposure Compensation
One manual control it’s useful to know about is how to adjust exposure compensation. On point-and-shoots, it’s often only reached by menu if it’s there at all, but in DSLRs it’s usually on a dial or wheel. I’ll mention some ways I use this later, but basically you set it to artificially increase or decrease your exposure to make up for mistakes made by your camera’s meter, when it is fooled by the light reflected from a beach or snow, for example.

Lagoon at twilight, Raratonga, Cook Islands. Canon Ixus 400.
White Balance: Don’t Chop and Change
As far as colour balance is concerned, while it is true that the auto balance setting on some cameras is not too accurate in mixed light, you won’t go far wrong in most circumstances you will meet when traveling if you just leave it on auto. Of course, it’s easy to make adjustments later if you’re shooting in raw format, and even with point-and-shoots, broad adjustments for example, for a cloudy day or tungsten light, can provide acceptable results. But if you start switching it around every few minutes you’re going to buy yourself some grief when you’re on the road shooting guerrilla style.
The great advantage of shooting in the studio is that you can control the light. Unless you’ve got a lot of time, you can’t pick and choose your light when you’re traveling. If I had to pick the greatest challenge I find myself facing while photographing on the road, it would have to be trying to create great images with the wrong lighting conditions.
The Problem with the “Golden Hours”
You’ve probably heard about the “Golden Hours”, the hour just after sunrise and the hour just before sunset, when the light is particularly flattering for photography. The problem is, there are an awful lot of hours in between when most of us will need to take some photographs! What’s more, if you’re shooting in Europe in summer, don’t forget that sunrise can be before 5 a.m. and sunset around 10 p.m. – that’s quite a spread.

Temple of Hatshepsut, Egypt: The pattern of the people is reminiscent of a Lowry painting, and retaining the intensity of the light captured the atmosphere - can you feel the heat?
Only Mad Dogs and Englishmen Go Out In the Midday Sun
Harsh, contrasty sunlight can be the bane of the travel photographer, but it’s no use bemoaning the fact that you should be shooting four hours later when four hours later you’ll be 100 km away. The same goes for dull weather; as a rule grey skies and rain make it more difficult to get interesting images, especially in cities with all those grey buildings.
Where you do have the choice, it is helpful if you can split your photo shooting into two sessions at the beginning and towards the end of the day to take advantage of the better light. However, for many of us on vacation that’s frankly impossible. That’s why we have to take our chances as guerrilla travel photographers!
At Noon, a Polarising Filter Is Your Friend
Harsh overhead light at midday is not all bad news, however. Polarising filters work best when the light is at 90° to the subject. Consequently, they are at their most effective in intensifying colour when the sun is overhead. So slap on the polariser, look for subjects with strong colours and create your compositions accordingly. Any shadows will drop out, of course, but think CSI Miami/Ken Rockwell vivid colour schemes rather than subtle shades and you won’t go far wrong. And if you’re a point-and-shooter, it’s quite possible to hold a polarising filter in front of your lens (if a bit awkward), or just try shooting through your Polaroid sunglasses (that’s a real guerrilla photography tip).
Those deep shadows can also be used creatively to create striking graphic compositions. You can even do portraits, remember that great shot of Marlon Brando’s bald head coming out of the shadows in “Apocalypse Now”?
This post will be continued tomorrow on dPS where Tony will share another 4 tips for being a Guerrilla Photographer. Subscribe to dPS to be notified of part 2.
Tony Page is a professional photographer and writer. View his work at Travel Signposts. Tony will be launching a new eBook in the coming days and we’ll have a great discount for dPS readers (stay tuned on Thursday for details).
Post from: Digital Photography School
Would you like to add an existing calendar to your Google Calendar? Here’s how you can add iCal .ics calendar files or online calendars to your Google Calendar quickly and easily.
Google Calendar is a great tool for managing your schedule and appointments from any computer or mobile device, but unfortunately it can be very time consuming to manually enter all of your appointments, holidays, and more. Thankfully, there are tons of iCal formatted calendars available online, and you can publish your Outlook Calendar in iCal format as well. Here’s how you can get these calendars in your Google Calendar.
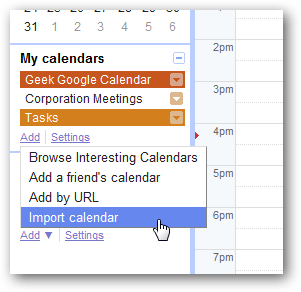
You can quickly add appointments and more from an iCal calendar or a CVS file on your computer. Login to your Google Calendar, then click the Add link on the bottom left column and select Import calendar.
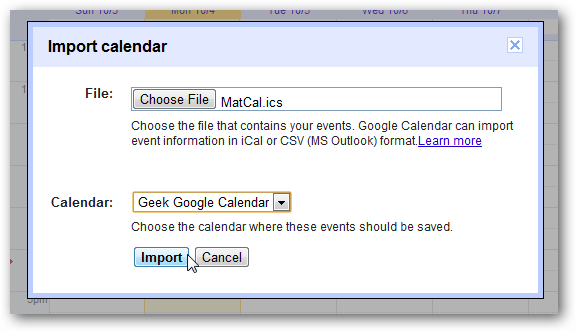
Select the iCal or CVS file from you computer that you wish to import, choose which calendar to add the appointments to, and click Import. Do note that the events are imported into the calendar itself, not added as an extra calendar, so make sure you want to import the calendar before adding it or you’ll have to manually remove each appointment later.
After a few moments, you’ll be shown how many appointments or events were imported.
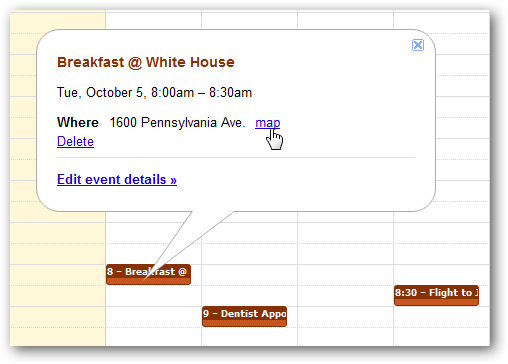
Now you’ll see your events on your online calendar, with all the features of Google calendar such as automatic Google Maps from locations already included.
There are many iCal calendars available online with everything from holidays and lunar events to calendars your church or team may offer. If you simply click the calendar link, however, you’ll be prompted to add the calendar to your desktop calendar such as Outlook calendar.
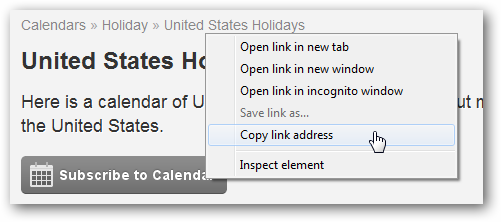
If you want to add the calendar to Google Calendar, you’ll need the calendar’s direct link. Right-click the link and select Copy link address to get the address.
Now, in Google Calendar, click Add as before, but this time, select Add by URL.
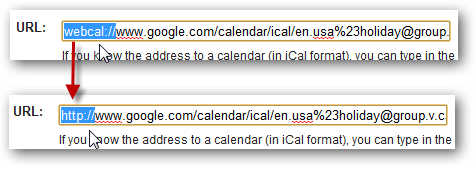
Paste the address you copied into the URL field in Google Calendar. Most web calendars will be designed to open your default calendar app by default, and so will have webcal:// as the URL scheme. Change the webcal:// at the beginning to http://, then click Add to import the new calendar.
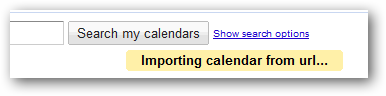
Google may take a few moments to import your calendar if it contains a large number of appointments.
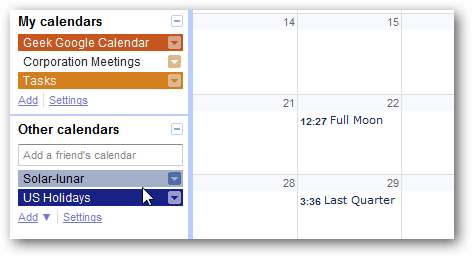
Once it’s imported, you’ll see the new calendar listed on the left under Other calendars, and the new appointments will be listed on your calendar in the same color. You can customize or remove an online iCal calendar just like you would any other extra calendar.
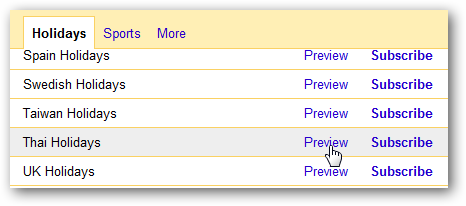
There are a number of premade calendars included with Google Calendar that you can add to your account without having to import an iCal file. You’ll find these by selecting Add, then select Browse Interesting Calendars.
Now you can select a variety of holiday and sports calendars for your Google Calendar. Click Preview to see what dates it includes, or click Subscribe to add it directly to your calendar. 2 clicks and you’re done.
This should you help you get the most out of Google Calendar without having to manually enter every holiday and event in your life. If you don’t already have .ics calendars you want to use, you can find some to get you started on iCalShare or Apple’s iCal Download page.
Want to do more with Google Calendar? Here’s some other How-to Geek articles you may find helpful:
Sync Your Outlook and Google Calendar with Google Calendar Sync
View Your Google Calendar in Outlook 2010 or in Outlook 2007
Enable Desktop Notifications for Google Calendar in Chrome
Dress Up Your Google Calendar with Event Flairs


![sshot-2010-10-05-[23-21-47]](https://lh3.googleusercontent.com/blogger_img_proxy/AEn0k_tOE3_2rS7Va_ZJfyvTRrytT_MNTz7xx2hplUF1bbkcYCGULI3IZRGmGT-J-GUpsuVdu4wQimA87Qxq32SJqzJjveoh-xlI8hZaYyxEIfPn6Wrc7urke1Xt4s18upaE886Ft1P78iJyUCApjzaH5sHRxtLu=s0-d "sshot-2010-10-05-[23-21-47]")
![sshot-2010-10-05-[23-23-10]](https://lh3.googleusercontent.com/blogger_img_proxy/AEn0k_sKvRsUqEX2n70F-LMranRLihMlLguDd7cGs9iEqOzC25RJ60NSUJpsV5QE5U9LBxPU-oZBxARVkUpgETXVWtb1uhfM572uWZn20bLd4Z3Z6iNPSiyz85yv2TmXAjB6Oh2j6wU6rcTgaKqPWF-fetuq-wnOPg=s0-d "sshot-2010-10-05-[23-23-10]")
![sshot-2010-10-05-[23-39-25]](https://lh3.googleusercontent.com/blogger_img_proxy/AEn0k_vkOPz2p1SF03NzLHXRNWTtQIsC_2jaYzUr21OgR_HUwmfXNniLnG9m7JowEFy-EFVHlYIc62bYAGJ2pQd_stmEQbilSF-GfdyO7gEbXcBWHSSt75dzOyVtAJDCNGxRtik_MN-uexOpT7F2lBaBrjUJMnw-Sg=s0-d "sshot-2010-10-05-[23-39-25]")
![sshot-2010-10-06-[02-03-57]](https://lh3.googleusercontent.com/blogger_img_proxy/AEn0k_v_endCzcOv3w-iGcvlap7-IKC4iDyXbO0vL_9GxU1cngKfoCnLiVr-JaZCJaQgIBsNxm77m9WtSZD7ephC7oIjcE_L4l6NRD_txFz5hsHvfPsa8LVfPQN-LNdyPTd0Yev-bNaNxlen6wQpWu33my74lovrAw=s0-d "sshot-2010-10-06-[02-03-57]")
![sshot-2010-10-06-[02-04-47]](https://lh3.googleusercontent.com/blogger_img_proxy/AEn0k_uQW-wV7rW3vLkVzKjefyKEEfPgG3BUMLEYBktp5TAOu7xmPMy-KRmN4OZxvIgr0PlPSNEmPakMnkoKfDnriv_nfZOObsSylWkhVIX9m7BeoSGtNYRV2rMemECCqzrUtFJwNjbLw7FfJkCvF4vgZKYNBfiWdA=s0-d "sshot-2010-10-06-[02-04-47]")
![sshot-2010-10-06-[02-06-14]](https://lh3.googleusercontent.com/blogger_img_proxy/AEn0k_uyJRCqxj4M3UHwZDx1sw4bGVbBTE5WOmxh8InCKgVFpmRIVRpUxQUP1cIwMvgdCpVmkb8cua1zr9ROKr1NF5TF02f7iP8FKKj1q1np92fzD3LZZ-UssIc91xzKA9cIxQZq8jW-iEnCjtpF0FZ4fpaZuiwkNQ=s0-d "sshot-2010-10-06-[02-06-14]")
![sshot-2010-10-06-[00-01-55]](https://lh3.googleusercontent.com/blogger_img_proxy/AEn0k_t9pfKu6fkBjaYeAGQSTtCnrd5-7TRVrC3BUSSlnxwNp3liW8gk5gxVqE1_Kt31LTVRtV8VKuo-bh5dmIf_EPmjsM5s6CJqRmNwxCp9Pg0dXBITb74yt6VN_LvuGwRljWcnLPS0YWM11QSVU5KEk5hBoJwQ2Q=s0-d "sshot-2010-10-06-[00-01-55]")
![sshot-2010-10-06-[00-47-11]](https://lh3.googleusercontent.com/blogger_img_proxy/AEn0k_v1yd7jnXnATGxGJ8ZjeUkd3wS-K91E6WLmnZ7BAd_Qjr5dsc0pclFqRO_jvr2aDoF9Eo9nq5j05ilhTxjIrKR0auJx7orOJqmWjkBqiV5ci_fmO5p56vFxqG-1S1dfxzRNneG3q94KsPVZnBe40JIvmm5cLA=s0-d "sshot-2010-10-06-[00-47-11]")
![sshot-2010-10-06-[00-48-32]](https://lh3.googleusercontent.com/blogger_img_proxy/AEn0k_tevf9ksNjpZ_1AnID2hxDpQ6momjWMoY-SdyHt-QElYNOJQBjKAn1a6NilEYivF1BAqjF18zW8P_QU1I8gaD-cE-H1ftKOWz4DwubaUJKPJRsbj40MJl8RnbkNKJzXgFFOQYGRAg4Tr_OzfmP-T7Y7OSZkqg=s0-d "sshot-2010-10-06-[00-48-32]")
![sshot-2010-10-06-[00-52-55]](https://lh3.googleusercontent.com/blogger_img_proxy/AEn0k_vI5j9l3rwLgNQXAlnfM9Uljvh45080VhzX78tY45yEHcY6NaPiEDF4g1_qvs0DNPxIV4kK0axNcNp4ABWXvY3rtgYl0XMFjBSPO0f3ylJBAOU2H4fIF_3xcoeQ3ww0mwvAydYYdOP-moV9DpJ9Ht9HttTp7A=s0-d "sshot-2010-10-06-[00-52-55]")
![sshot-2010-10-06-[00-56-01]](https://lh3.googleusercontent.com/blogger_img_proxy/AEn0k_ufXO0oOzKDd0eqkk2f32Peg9BVx4DvZraRcB3rBpNFUb53_Gbb6GhDQC-Wgq28CzZ_OxCJMq0gJJ__wfCPc3LDHeb2Y6XXG2LgDpGoC_Z7ermCw4Qh6nfHpV7vvtcN89miWyuS2PemQlDBwRSNegOddeaQ=s0-d "sshot-2010-10-06-[00-56-01]")
![sshot-2010-10-06-[01-03-29]](https://lh3.googleusercontent.com/blogger_img_proxy/AEn0k_sfmUw25e8WWwSxqFfKGfJ_0L4X_PqwkH4S_0jKyeB20Tf8DAUpFetRO1Gtz8BzvexCPhnjD5hxmuyTgNmUh9nwb1pAbcu-f0Am6SfFteo5LgSdl8TXWucbPyffZA5DFsyvV175PKdDm3zCb7oHsnjlUaXrCg=s0-d "sshot-2010-10-06-[01-03-29]")
![sshot-2010-10-06-[00-57-29]](https://lh3.googleusercontent.com/blogger_img_proxy/AEn0k_sEejjAJryPI_n-E4_EIs-hjg3zRALZ_Q_wIQW34QRAmXt-XwYGIsANwDNAa_Z-7ZVj1EDPj-UFDKXpZ91K_Ja7gO1VM9hVKYKMfOksKnp5HXFjc5y840ZQTFBb2_d5Wn7DXjNRkUbChfsxY8qYvsu4Nuyi9g=s0-d "sshot-2010-10-06-[00-57-29]")
![sshot-2010-10-06-[00-59-28]](https://lh3.googleusercontent.com/blogger_img_proxy/AEn0k_vrAucb9g6dEARqpxAv_bagej7LOM0WohxaGVCPpQCdbzkANWUjGicwMgLkFAMR4-7iUKZGqGwc889fWg1zsvIciou9cYEc8XTkHSY8FPtpauNCS4sp_51Bpzdis_T8O4LQDMHfcdZch22Vbhos5AHmhuu_1A=s0-d "sshot-2010-10-06-[00-59-28]")
![sshot-2010-10-06-[01-05-37]](https://lh3.googleusercontent.com/blogger_img_proxy/AEn0k_sAq1S7uSFcCojdmIpBGyrFPN4K0UkoYCXo1XkjOJWM0Ry4l3G2ohr3PJhgy3PvBONsWKD-mo-70d8V3jOu0TPAiqw-xVfI6mbCXYR27YxGKXsd0c6OS4zmBAap1yYNvsjfR6U6YFl8-76ZwNYYOGleyeTY=s0-d "sshot-2010-10-06-[01-05-37]")
![sshot-2010-10-06-[01-01-46]](https://lh3.googleusercontent.com/blogger_img_proxy/AEn0k_tyemxqvMMM1wRz1rPj_OHaZpLlcrVDLSYvtw68hmrchWR7FK-2NZ0k_ri69-PyjvvndH4_RBqO6nYr-Nt75fltcDbK5ST3p8HqPlm_TX7f5wSsirG_GW2nYcM2RUNomYftgQYz5dM9qwIDhs8EVVDNdP6J=s0-d "sshot-2010-10-06-[01-01-46]")
![sshot-2010-10-06-[02-27-52]](https://lh3.googleusercontent.com/blogger_img_proxy/AEn0k_tbE1n_68LIRTpYrOa_BHWKITm3aWJ050P-M9jRc8DuwIGWH7g9G9Ff_IwahLQQtuvz0jcv-ou2p--T6wxtIl5jdCW7qOZNANYqdeSrvaIM-fzG20cm2nwobHZLOKbBxXFbZloMh4wMS_-KXrXsQnqX8mGTFQ=s0-d "sshot-2010-10-06-[02-27-52]")
![sshot-2010-10-06-[02-28-26]](https://lh3.googleusercontent.com/blogger_img_proxy/AEn0k_uJryWTwHYSo2-q1-lpipt8tUCab8DvNFxiyelTNY9C7o4mPLfwGrWcol1Lth0fsNnC-ZaHvpiHK8MYg-DntypE_KjhXuQ1T8hNy1F_vZ-5RTud93fRiXS4Lm9fkn53mjpbpcu4qer-KpNd9wvuJvW67LCA=s0-d "sshot-2010-10-06-[02-28-26]")
![sshot-2010-10-06-[02-28-55]](https://lh3.googleusercontent.com/blogger_img_proxy/AEn0k_sgjmkHv7CspLVP0TCjSPam77vClLfY-LrALpiyRgEWDo8T8EDnSjnL5YhbDcibldausVfByG7di4-jS0-BdJMeES-GmHpm11u46dG7vEwYQUXPVQbLRyJXzDuJyd5iQfADee-vuGCivHU2dPwtpptZyxLlYA=s0-d "sshot-2010-10-06-[02-28-55]")
![sshot-2010-10-06-[02-13-11]](https://lh3.googleusercontent.com/blogger_img_proxy/AEn0k_vbUHbogA3fPhsgcnTeYQClEZa1vssQqS4sshPK1MYAQbx0R4uO6zwQpJEqK0RClKaf8WZ68ubK_2LD4-kqtmo-VTA8P3g09YxO7rPILTNGbIe2cZv7q1gSqax8scgsTN1GUziIxPyh_F5ekTsDORk9Qs51qw=s0-d "sshot-2010-10-06-[02-13-11]")
![sshot-2010-10-06-[02-15-56]](https://lh3.googleusercontent.com/blogger_img_proxy/AEn0k_vPhnBKuz6aOzZCbltsDVJaqwDgDSoz1l-VZCiYztO-warzouODgAIcD5NT-Vt5dZS8qRuCeANWG8pJxwekKyyGzjDS3DdKmkwxFgO6I8xx7ss6X_VsdVtFimneSYmAV8w05IwEX83TPyMSPMTySrCyFtBu=s0-d "sshot-2010-10-06-[02-15-56]")
![sshot-2010-10-06-[17-01-10]](https://lh3.googleusercontent.com/blogger_img_proxy/AEn0k_tlR_DbWIHo_a2OQLQjh1E1XKQi7tiKfAUb37aczIHFmd73MBQc9zcKpXPYgnCF-gXCMUbiRIDfeZlFy9P25C9IS9xTJgGFHK8rsFwyb_cowcL0sIt1CI-oE9SR_d-5CiWG3PxPF4_3Zv1T4WCDMDNzA7R0=s0-d "sshot-2010-10-06-[17-01-10]")