Would you like to easily access all of your Google accounts without using multiple browsers or special addons? Here’s how you can use the new Google Multiple Sign-in feature to quickly access all your accounts.
Google services permeate most of our online lives, and many of us end up using multiple Google accounts for different projects. You may have a personal Gmail account, a specialized one for your website, and another for using on public forums and comments. Before, the only way to access all the accounts would be to use multiple browsers or to use special extensions to sign in to multiple accounts at the same time. Now Google has made it easy to link all of your Google accounts so you can access them directly in the same browser.
Add Multiple Sign-in to Your Google Account
When you access any Google service, such as Docs or Gmail, you’ll see your Gmail address in the top right corner. To add multiple accounts, we’ll need to edit our Google account.
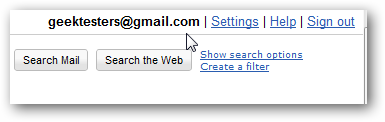
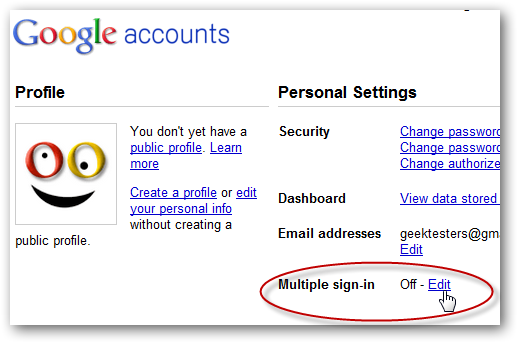
Head over to Google.com/accounts (link below), and sign in with your main, standard Google account. Make sure you use your primary account, as this will stay the main one you’ll see when you access Google services.
![sshot-2010-08-09-[33]](http://www.howtogeek.com/wp-content/uploads/2010/08/sshot2010080933.png)
Click Edit beside Multiple sign-in under the Personal Settings section.
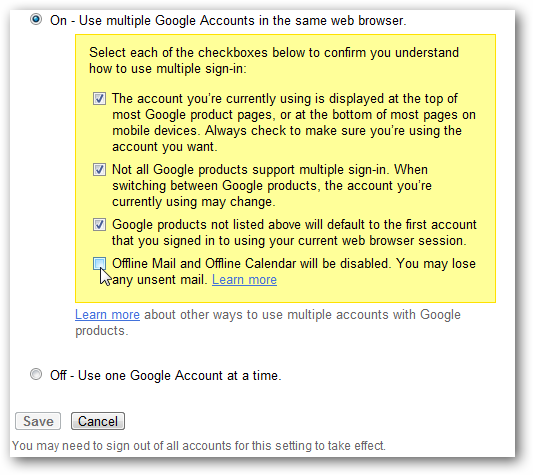
Select the On – Use Multiple Google Accounts in the same browser, and check each box to show you understand the limitations and features of Multiple Sign-in. Not all of the Google apps currently support it, but most of the main ones such as Gmail and Docs work great with it. Click Save at the bottom when you’re done.
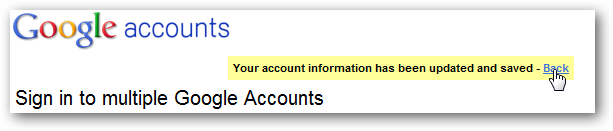
You’ll now see a confirmation in the top of the page. Click the Back link to go back to your Accounts settings page.
You should now see a down arrow beside your Google account. Click it, and then click Sign in to another account to add another account.
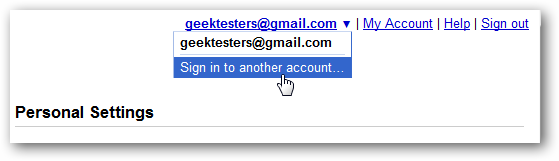
Sign in with the other Google account you wish to add in the login box.

Now you’ll see your second Google account when you click the down arrow beside your email address. Your first, main account will be listed in bold as Default. Click the other email address to switch to that account.

If you’d like to add another Google account, simply click the Sign in to another account link again to add it.
Remove a Linked Account
Would you like to remove the extra accounts you added? Unfortunately there isn’t currently a way to remove just one linked account, so you’ll need to turn off Multiple sign-in to remove the accounts. To do that, login to your Google Accounts page as before, and click Edit beside Multiple sign-in.

Click the Off bullet near the bottom, and click Save.
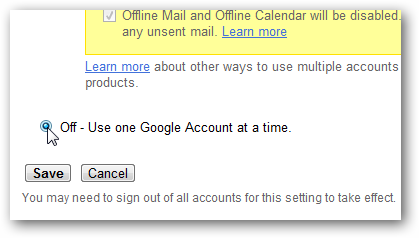
Once you’ve saved the changes, you’ll only have access to your main Google account. If you ever decide you’d like to add the second account again, repeat the steps above. Note that this fully removes the data about your second account from the first account, which is great if you accidently added your account to the wrong Google login.
Conclusion
Whether you have multiple personal Gmail accounts or use one for business and one for personal use, this is a great way to keep your accounts together. Unfortunately you cannot access your Google Apps accounts this way, though you can already be logged in to a Google Apps account and a standard Gmail account at the same time. Google Apps account support will be added to this eventually, but for now, it’s a great solution for accessing any of your standard Google accounts without logging off and on or using workarounds.
If you’d like to send and receive email from other email accounts, including Hotmail accounts, inside Gmail, here’s an article on How to Add Pop3 Email Accounts to Gmail.
Links
Access Your Google Account Settings
More info about Google Multiple Sign-in


 "
"


 "
"


 "
"

![sshot-2010-08-02-[17-17-21]](https://lh3.googleusercontent.com/blogger_img_proxy/AEn0k_t9w-99rTaX7w7N9K7luLI2Q834_xlzbl6QhhOWI8fCa8DfOmJdE3qm7uB7uYciIvBrN4zR94gjmJ80t0OlQTNlgbBmalYaNHgF4nStfJhtQRs6PunmrKdTRrWRivmJ3y8yErNJvjbwHRpPY0VxqQ=s0-d)
![sshot-2010-08-02-[17-23-30]](https://lh3.googleusercontent.com/blogger_img_proxy/AEn0k_vKXr_STRMU7uurFd_7vtmfYEyqkX2s2ZPnLrAPwLoXWWfgLB-_iygsmSosdMV63H9PxhBGjEI6Ti1FeogSgc2pT3vvitHvZQbmL48458Rnq53xHRJZmLlXstiW5B46r3om0YnVxcYoOMmWNw9iMA=s0-d)
![sshot-2010-08-02-[17-24-20]](https://lh3.googleusercontent.com/blogger_img_proxy/AEn0k_s1Tsg8z0L_rDbJb89oF2og_Zh1cUqQD5ZDcCTBQ-rTFKplcdshzv-TnNz1R9RPBBd5bbWDFmKHYjAaLjbsgjghm5L3GK3ndGOYf9OCf3NKeQbiP8lhUBL9Eu3Bcl0J3pD4B7ejtP26zIz0_gadDg=s0-d)


 "
"
![sshot-2010-08-01-[22-17-23]](https://lh3.googleusercontent.com/blogger_img_proxy/AEn0k_t2IVp4Pe_KTW_GlvebgpZysa0Vb6OmLi5N19saEOFYQQdLmTBUBjuZH3-3yd6aMSeC16uZRZzlFV30lg1HyQkE4ZZGPzhMvbuKkekWBRShRpVPZvKpp_m4tc8NHhc1mtpnWyBzTTALEr7o3XGgeA=s0-d "sshot-2010-08-01-[22-17-23]")
![sshot-2010-08-02-[21-19-31]](https://lh3.googleusercontent.com/blogger_img_proxy/AEn0k_vJD0xlSYWcYvfbM_MD5-3WddgPZg81HdjIqzb3_aWR7HSHbPPCg5z2laIp8mZydxK3PaEuajwYFVkIp0nHC2K2ButJEsCbR4w_-zzyCvpD9-pGiRZXevDf2zd7xaLE1kkAH0U31faatpIDPiD5Kg=s0-d "sshot-2010-08-02-[21-19-31]")
![sshot-2010-07-30-[17-57-31]](https://lh3.googleusercontent.com/blogger_img_proxy/AEn0k_us73-RasxoE7bLVh0bsI2XIGJHDlsoOAGtDyT_ONUSccYvx1YotiJkaLteje_j2nB_zxB-i39cOn0xYpZl3blszS0TK-x1KiJp3Az6ChlMeQ9nfu2d_Cr44Q-65irAG2Tcowg2d7O4gIuJ9V-95Q=s0-d "sshot-2010-07-30-[17-57-31]")
![sshot-2010-07-30-[17-57-40]](https://lh3.googleusercontent.com/blogger_img_proxy/AEn0k_uo-s74SHcOxUnFf4OjySSjGfoWNefYb0O7x90fPN9FNhyaUGSRlBiM14dnwAImfUc0lQArohkDY5Vqq94uiZHmY9VYVyXguBoUEU9-Rkl2A2QX7GpxLoIdXbCq3jjD8OKtJU3gpiYfaZV9tb1VZQ=s0-d "sshot-2010-07-30-[17-57-40]")
![sshot-2010-07-30-[17-57-48]](https://lh3.googleusercontent.com/blogger_img_proxy/AEn0k_v4kLZhLRNeJmOF7ol5sK-Q-tNiiRxuSVYE-U2uoAzh9ceEsBd1Q-90OcXJNUYg-B3GqaXyYvvL07Hw2YjOAfFANzMxt6aSjFp9W3Di2m3QxjvtgwreAqqK10ViAOOqpGk2Ez5Nuv10K4mvdPLr3Q=s0-d "sshot-2010-07-30-[17-57-48]")
![sshot-2010-07-30-[18-04-40]](https://lh3.googleusercontent.com/blogger_img_proxy/AEn0k_u0igUz5Q6D5rxiSNEAFkfLuWcSQCJa2qXZuty3Re1o1ZdMmIEsbMupLGvHdjwyHgIXG7ziJE9EqrxZbDTrY7jkRfRFvNU-pv52dSZUCiOk7dUWD34uRrOjid59x8raBePhQNtkhBERIgGH3ZpXdw=s0-d "sshot-2010-07-30-[18-04-40]")
![sshot-2010-08-01-[22-14-07]](https://lh3.googleusercontent.com/blogger_img_proxy/AEn0k_u0P40sRir56cK8ROylS_sej7dMWSH5tUJbPQEO1JLy3iGFUy3ft4EUMWH-Vf-uGM_ZNyu6KZxJaSoVgMHJgryE2BmdBMM0ptGp_zh9aMhXlHuRzvRphVGxKiAW2xUMXuhgGozOmPE8iDxbNo121w=s0-d "sshot-2010-08-01-[22-14-07]")
![sshot-2010-08-01-[22-15-20]](https://lh3.googleusercontent.com/blogger_img_proxy/AEn0k_vRnJ20INjQyF1pmzAKwM_vPskhpwvs5YNxDI4RPThN4lyKlwXAYHwPJWh2Bl49x6QeNbk-W36b6R-llLaSxc7Vma7YUj7L08hdvIHhaXqM0K0oxhDCk9ZJIgLWTwWEZ6kgWLzreUKjbhOXPSqR=s0-d "sshot-2010-08-01-[22-15-20]")
![sshot-2010-08-01-[22-14-57]](https://lh3.googleusercontent.com/blogger_img_proxy/AEn0k_vXR3fePdIqXh-NnlPRG0kEVdokJZ9jRpVo8vhUapg9vfmBQApvpOcQqY0jx1tK3M-NJVyuvih_WmrEMzYpaSh8Z4zELhFgf_BCyaqUYnHpLM0NOrBLfxmWke3xrUQPQVmYkZIUC6Mwv0br8QTP3Q=s0-d "sshot-2010-08-01-[22-14-57]")


![sshot-2010-08-02-[21-33-44]](https://lh3.googleusercontent.com/blogger_img_proxy/AEn0k_uMojFw7UUQM8ZCZaAmI_-tJ9lqtAyQjir6Xh1puSjL5C79yCr6o4dH_kJDTXjGA08x0Q2DZV-Xk5gjlAItQnFE1F6EzVihoOqSCu7uuB3JILObQ8KhUMyPs35l-N3bYf3Hude5TSCjZZlXjYBI=s0-d "sshot-2010-08-02-[21-33-44]")
![sshot-2010-08-02-[21-42-29]](https://lh3.googleusercontent.com/blogger_img_proxy/AEn0k_udTV3VmeNmoh6aR7nQj6YdVKmsISfaQ2XaOTAJwu7F830xkCVH33c6oWQZizz6cg3CLqprEJhZv5VL4z3rxZ1H8uiBDVl3FMG9rBYb2uOHBbgl8UqHXC8W6S42SM490aW8es03LjUuag9WMDvHPg=s0-d "sshot-2010-08-02-[21-42-29]")
![sshot-2010-08-02-[21-37-19] - Copy](https://lh3.googleusercontent.com/blogger_img_proxy/AEn0k_uFkJAl23YSauN3NfNZYegemRHyGFyL2qjNJndonUJ_j_9Gbk4C8q8CuOEYPbyxcoun5BOqs8bDD-pdKPyrBnHl07RY6lsQy3zjKcVX5PwxtugBmk2_IPorevYnZghgCL16bTD9kcYzy3rn_UrnHZEkhCE=s0-d "sshot-2010-08-02-[21-37-19] - Copy")
![sshot-2010-08-02-[21-45-42]](https://lh3.googleusercontent.com/blogger_img_proxy/AEn0k_seQ3Hz2FIDct9tFfGKetDOm1QG_npZE0b9f02CheZg6F2DXLJ6X1C-JxOWVMGxYGYghZd6AfoErSUFOAeLRjhMdUbTLMLlvkP87iGosBorZd-Urj42XsnNCWg6yzj91uQCggfM5Dlu4Evu9R1U=s0-d "sshot-2010-08-02-[21-45-42]")
![sshot-2010-08-02-[21-49-47]](https://lh3.googleusercontent.com/blogger_img_proxy/AEn0k_s7Kfcu169ZuMdZ7Lnz5bWPMC4SQuP7U6hGy5rTbm_co2GiP5lIQYG-EckhuvzHRltV7Z-u91mueCa81pElOv0SGPlIqYfkJlgO3mdezMNcpHD4FVJ3w_ZLDYYCS5YfPhMwSpbT0N2-0XDgQ0slFA=s0-d "sshot-2010-08-02-[21-49-47]")
![sshot-2010-08-02-[21-52-04]](https://lh3.googleusercontent.com/blogger_img_proxy/AEn0k_vA0Qhi5PYmHQ8wOg_DZYPNUidlLdsJN6tCH4uZt71cLR9zD746UWlq8moWSSS84buScZ8pCBiGwh1WnCd_FtFrWoWPYpwBd6grbIKiWIo8jIPFaWsHXffnfDQ_RE5VVut_xfE7tiHFyh5-9IyVxQ=s0-d "sshot-2010-08-02-[21-52-04]")
![sshot-2010-08-02-[21-53-56]](https://lh3.googleusercontent.com/blogger_img_proxy/AEn0k_vktq6S4BXxI04WJQDJ6mXM9tR-qpzNZKoORhsimKuU1_Eyby5Qa1KmewmloHtOXfXSHRsgwnjf47niasTQYLgDg52BxDDy-yDkygQIkVC9_UWGl3podG9KgLXacN4Ev6y8Bmqog_uHFNSgVvdqqQ=s0-d "sshot-2010-08-02-[21-53-56]")
![sshot-2010-08-02-[21-56-27]](https://lh3.googleusercontent.com/blogger_img_proxy/AEn0k_vTXA6vlMjafmdMiiP_raMhEqQypHssrOErgG0tpPMuyVLqYOxDB6aLNuUpSOXgzngOaEQMVzjmrbidbYCvCBDz-XXkiDUOVpHgBKCc4evZhE6JCQiKBjQq3lAifrENqi3nE-vaEeu3hv77BbuHNQ=s0-d "sshot-2010-08-02-[21-56-27]")
![sshot-2010-08-02-[22-04-56]](https://lh3.googleusercontent.com/blogger_img_proxy/AEn0k_uraWOsHRnnZ8u0giFwrju0x1qprU3YEt7UW7FfuE8q0RBa6Aumt9gAZ_upfnDK8q8usZMw4A8dBRA2S2k2tB0Mn6mKOV0k6wBkW_I90bPvmk99zSXRLPn1JlXEcQrWbbeUg65iL7SboQhwARtVZA=s0-d "sshot-2010-08-02-[22-04-56]")
![sshot-2010-08-02-[22-06-18]](https://lh3.googleusercontent.com/blogger_img_proxy/AEn0k_u1pqCUqzeYt0WqXU4c7R3SSQh4-Sy9y5ZTrOrn8rWuUgO_9754OdUmv2mB_h8iw3-LElidsElwQDwuYFp9dw-LfHTyetfUMLSLzOkz1uF9_PIAjKyUyhqMPZ3KC55qj77iimStp2mhwTRcvrxaWQ=s0-d "sshot-2010-08-02-[22-06-18]")
![sshot-2010-08-02-[22-06-43]](https://lh3.googleusercontent.com/blogger_img_proxy/AEn0k_ubvJRLXv_eahnXn4ZgexwiyVjT125yN7uLDoDSYdmPT-TnEYaB-2wpaFY6pHRq0kUNSCCAwjga6iqpl_IYVRlqIO4ri1ZSGFvm8x0zCjuSOr7U5v0kOqaLRwTOZG-DoWuA32QAW3UjbzOyBcgLtQ=s0-d "sshot-2010-08-02-[22-06-43]")
![sshot-2010-08-02-[22-06-51]](https://lh3.googleusercontent.com/blogger_img_proxy/AEn0k_sPcTSyGjzHyPlHtgFMQ-189BxdmyVh9kD67XczMGs00upgwP-XnH61xcBGtpkaa3ZfEeBXMNEr5KFLkvBnxO1aADLkBBdJjsUgcC8X2QRFOmw6mWKJ_PdQnodBHy8sbZXaKionHYhuBpIv5kqw=s0-d "sshot-2010-08-02-[22-06-51]")
![sshot-2010-08-02-[22-07-44]](https://lh3.googleusercontent.com/blogger_img_proxy/AEn0k_shz4sUZVue8hXm1LOO4A4uwHg07b0izUIgRaJQ8SMPZzTaKbC7iEZ9AkomivSnqkkqpBil2Q5lf9wBQU1Ix861yta-HbHDtvqWq0WYUxOj7YHgPK_8n1Wx9acXpjcrKURra1EOxZsIsVUxhvVRQA=s0-d "sshot-2010-08-02-[22-07-44]")
![sshot-2010-08-02-[22-15-14]](https://lh3.googleusercontent.com/blogger_img_proxy/AEn0k_u-VuYEzc7n3L5lHR8NG80q_VU5vW5nhHWhNEVJX0JmR8I3K_Ju974Uf-bocqfRlTnJem6M5akJ7ojfzUcViupDX_T4isrAy7t0tXaFAZ54sM7B3BnEu2l8Vs6Vh1rY4D2BjCPtgYOLGh3bm7Yg=s0-d "sshot-2010-08-02-[22-15-14]")
![sshot-2010-08-02-[22-18-41]](https://lh3.googleusercontent.com/blogger_img_proxy/AEn0k_vP4qKseUCiGMo6g1t5P2KzM0XlTTPn9DuyvlDUmFqCWT6XM7STEJJfomHGKefSvNZr0s5qScQLMhxYiEuPwSYkuOPiKhkk5lg4UFheG860HOaQTR1hXNpcN-h_V03VK76Vyt0nZhPDrrDiJrR2hA=s0-d "sshot-2010-08-02-[22-18-41]")
![sshot-2010-08-02-[22-31-30]](https://lh3.googleusercontent.com/blogger_img_proxy/AEn0k_sWlA__qlDworkT3IY-zaE-TAKPMhPJ8fsIsnxNom6MNNFrs__m795V05NfdRk6Rxlzp0_AZH5P_uhncFvgV3IMWIkeyHyHrdGAo9FhXSQAie-0yevZL21NS5Qr3nwdJWZ49dXvtNbGb9HTLlZz=s0-d "sshot-2010-08-02-[22-31-30]")
![sshot-2010-08-02-[22-32-04]](https://lh3.googleusercontent.com/blogger_img_proxy/AEn0k_s9FX7dnJvJ5idJVjMcpux8jzbOPlmem__839Q7WAQEV6rKFgLIu1FqGCpIqNTaH0u6Ge8hLsq_Uur1zDHSgX_KQUAK7QIn8Y9BhsUALVH3gpY3J8L4VGpMGnRXP3zCene5MeN-mSPYXeLENBnw=s0-d "sshot-2010-08-02-[22-32-04]")
![sshot-2010-08-02-[22-27-02]](https://lh3.googleusercontent.com/blogger_img_proxy/AEn0k_vS1feLtaUIAhD1qYXwSYMqvzO3mLe_5DhvHkidBf0yw1hjA9WboEPlRp5ug1b87W5R8JOp1yxhIhLSYShAySMOEC57XNIDU0439907iV_XPSvGKOujcNGn0qJFSJgxxgteMgJ3lCKSajgwY_uFTA=s0-d "sshot-2010-08-02-[22-27-02]")


 "
"