Tuesday, July 06, 2010

Rip a TV Series DVD and Convert to Individual H.264 MP4 files

Rip a TV Series DVD and Convert to Individual H.264 MP4 files: "

Would you like to rip an entire TV Series disc set and convert the episodes to individual MP4 files? Today we’ll take a look at how to setup and batch process an entire DVD set using Handbrake and the H.264 codec.


In all likelihood, any commercial DVD will be copy protected. Handbrake doesn’t have the native ability to remove copy protection. So we will use HD Decrypter, which is the always free module of the DVDFab software suite, to rip each DVD to a folder on our hard drive. Then we’ll use Handbrake to convert the episodes in those folders to individual MP4 files.


Note: You’ll get full access to all the options in DVDFab during the 30 trial period. HD Decrypter is always free. You’ll also want to be sure you have plenty of free hard drive space. In our example, we use a 5 disc set that took up over 30 GB when ripped to a hard drive.


Download and install DVDFab. You’ll find the download link below.


sshot12


Open DVDFab and insert the first disc in the series set. DVDFab will open the DVD source.


sshot-3


Next we’ll check the settings so that the default output is a DVD folder. Click the green button at the top right.


Note: After the 30 day trial expires, you can skip this step. Output to a DVD folder will be the only option.


sshot-5


Select DVD to DVD on the left pane and choose DVD folder as the Default output type.


sshot-5


Select Full Disc from the options on the left. (This should be the default)


sshot-4


Click Start when you are ready.


sshot-6


Conversion times for HD Decrypter will vary depending on hardware, but it is generally pretty quick.


sshot-7


When the process is complete, click OK.


sshot-8


Select Finish. Now repeat this process for each DVD in the set.


sshot-9


When you are finished you should have folder for each DVD in the set.


sshot-10


Handbrake


Download, install, and run Handbrake. You’ll find the download link below. The first thing we’ll do is configure the settings. To simplify the process of choosing output settings, Handbrake has a group of of presets. If converting specifically for one of the Apple devices listed in the preset list, simply click on that device and the settings will be automatically applied in the Output Settings tabs. For basic PC or universal output, select the Normal profile or High Profile.


sshot-12


Now we are ready to add the episodes to our queue to be converted. Select Source and then choose DVD / VIDEO_TS folder.


sshot15


Select the first folder in the series and click OK.


sshot22


Select the Title dropdown list and inspect the listings. You’ll see a group of titles and durations. You should find a group of titles with running times that match the approximate running time of a single episode in the series. In our example, we are converting a series of one hour shows, so we have two titles running close to an hour. For a broadcast TV program it will be more like 40-45 minutes for an hour show and 20 minutes or so for a half hour program. You may want to refer to the original DVD if you aren’t sure of the number of episodes per disc and running times.


You can ignore any additional smaller clip. They are likely to be intros and extras. Select the first title you’d like to add from the dropdown list.


sshot-13


You can manually rename the file right in the destination text box if you wish. Careful, Handbrake will automatically give your file a M4V extension if you choose MP4, so be sure you change this unless you will be playing the files only on an iPod.


sshot-21


Select Add to Queue when ready.


sshot-14


When you’ve added each episode from the first disc to the queue, continue adding episodes from the next disc. Repeat this process until you have added each episode to the Queue.


sshot-16


When you’ve added everything, click Start on the Main interface to begin the process.


sshot-17


Handbrake will begin the process of converting the episodes one at a time.


sshot-18


When the process is finished you’ll have a season’s worth of individual MP4 files. Once you’ve verified all the MP4 files are to your liking you may want to consider deleting the original DVD rip folders to free up some hard drive space.


sshot-23


Now you’re ready to enjoy the series.


sshot-20


Conclusion


Handbrake will give you good quality output at a greatly reduced file size, but it is rather slow. Be prepared for quite a wait when converting an entire season DVD. If you prefer to get the full DVD contents from your hard drive, you may want to check out our previous post on how to Rip a DVD to your Hard Drive and Play it on your PC.

Integrate Social Networks with Windows Live Messenger Beta

Integrate Social Networks with Windows Live Messenger Beta: "

Would you like to integrate Windows Live Messenger with social networks such as Facebook? With the new Messenger beta, you can do that and more quickly and easily.


Getting Started


To try out the new Live Messenger, you’ll need to install the new Windows Live Essentials beta. Download the Essentials installer (link below), and install as normal. Many users will already have Messenger installed, so it will be updated to the latest version; otherwise, make sure to check it in the installer.


image


We’ve already looked at an overview of the new Live Essentials, so if you’d like more information about the installation process and the other Essentials apps, check out our Screenshot Tour of the New Windows Live Essentials Beta.


Once setup is finished, launch Messenger from the Start menu. You’ll notice that the sign in screen has slightly changed, with a new setup progress indicator at the bottom of the window. Sign in with your standard Messenger account, and select Sign me in automatically if you want Messenger to automatically use this account each time you launch Messenger.


sshot-2010-06-30-[01-00-30]


You can now add social services to Windows Live Messenger, including Facebook and Myspace. Currently these are the only supported networks, but others may be added before it is finally released. If you’ve already added social networks to your online Live account, you won’t need to configure anything else. Otherwise, click the social network’s icon to add its settings to Messenger.


image


We added Facebook to our account, and the setup should be similar for other networks. Select what you want to see in Messenger, and the click Connect with Facebook.


image


Now, select if you want to see highlights from your social networks, or news updates from MSN. We chose Social Highlights so we could see information from our Facebook friends and more, this is the best way to experience the new features in Messenger.


image


The New Social Messenger


Here’s the new Windows Live Messenger. The main screen has been entirely overhauled, and now shows updates from Windows Live, Facebook, and any other networks you may have added. You can update your status on all of your networks at the same time from the top, or just chat with your friends as before. Currently you can comment on friend’s Facebook posts, and in the upcoming final release you’ll be able to chat with Facebook friends directly.


image16


While the interface may look plain at first, it actually incorporates nice text and photo animations, similar to “Metro” interface used in Zune for PC and previews of Windows Phone 7. You can switch your current social view from the text labels on top, similar to the menu system in Windows Phone 7.


image


Enter a new update and press Share to update your status on Facebook, Windows Live, and other connected networks.


image


Updates from your friends and fan pages on Facebook, Windows Live, and other networks show up directly in Messenger. You can comment on updates, and even view YouTube videos that your friends have shared directly in Messenger.


image


You can also click on your friends photos from Facebook, which will open them in a beautiful slideshow window. You can browse through their photos with your arrow keys, and comment on photos directly in the slideshow view. This was one of the nicest features in Messenger, and made the pictures look much nicer than they do on Facebook!


sshot-2010-06-30-[00-54-48]


Unfortunately, some slideshows didn’t load correctly; hopefully this is something that will be improved before the final release.


image


Or, if you want to see what’s going on in the world around you, click the MSN link on the top left to see the latest news from MSNBC directly in Messenger.


image


Messenger is Still Messenger


With all the new changes, you might run Messenger and not even use the old Messenger chat itself. As noted above, your buddy list is still on the right, but if you prefer to use Messenger just for chat, then click the button on the top right corner to switch to compact view.


image


This makes Messenger look and work more like before, and makes Messenger more focused on just chat rather than social networks.


SNAGHTMLe9b383


You can also still access the traditional file menu. Just press the Alt key, and the file menu will appear just like before.


image


For those who like to customize it, you can now use any of the new Live themes, most of which are based on the themes in Windows 7.


image26


Power users will appreciate the new tabs in Messenger. Now you can chat with multiple friends without having a dozen Messenger windows open on your desktop.


image29


Windows 7 Integration


Messenger offers several features that make it integrate nicely with your computer. It includes new toast notifications when new messages come in. If you have a Hotmail account on the same Live ID, you will receive similar messages when you receive a new email.


image23


The taskbar icon also shows your current status, and you can change your online status in one click from the Windows 7 taskbar preview.


sshot201006262212342


If you have multiple tabs open, you can select them individually from the thumbnail previews, just like you can select individual tabs from IE8 in the taskbar.


SNAGHTMLdb3dea


It also has a Jumplist, and you can start a chat or sign out of Messenger directly from it.


SNAGHTMLd9b825

By default, clicking the exit button in the Messenger window only minimizes it to your taskbar. You can fully exit it by clicking Exit Messenger in the Jumplist or by clicking the exit button in the thumbnail preview. If you want it to behave the way it used to before Windows 7, check out our article on how to make the Live Messenger close to the System Tray.


image


Conclusion


Windows Live Messenger is one of the most popular instant messaging programs in the world, and the latest version tries to make sure it stays relevant in the age of social networks. If you’ve found yourself using Facebook more than Messenger lately, the new version may make it easier to stay connected both ways. We enjoyed the subtle animations and found the photo slideshows to be a much nicer way to enjoy Facebook pictures than the default Facebook interface.

Download Live Messenger Beta with the Live Essentials Beta


Change Your Wi-Fi Router Channel to Optimize Your Wireless Signal

Change Your Wi-Fi Router Channel to Optimize Your Wireless Signal: "

If you live in an apartment complex you’ve probably noticed more than just the passive-aggressive network IDs that your neighbors use—very likely you’ve had problems with your wireless connections dropping out, or just not being as fast as you’d like. Here’s a quick fix.


Of course, this isn’t the only thing you need to do to make sure your wireless network is running at maximum speed, but for today’s lesson we’ll show you how to pick the right channel to make sure you can stream the new Futurama episode to your laptop without skipping.


Note: if your Wireless network is working fine, please don’t mess with it. Or at least, don’t blame us if you break it.


Figuring Out the Right Wi-Fi Channel


The first thing you need to do is grab yourself a copy of the free inSSIDer utility, which will scan your wireless network and probably reveal some humorous names from your weird neighbors. If only they could learn how to park their cars like decent human beings.


image


Let’s take a closer look at that window… you’ll need to choose the right channel band, depending on the router you are using. Mine is a Linksys dual-band Wireless-N router, which has two separate networks… if you aren’t sure, go for the 2.4 GHz one first, and then click the Start Scanning button.


Note: If you have more than one network card enabled, make sure the drop-down has your wireless card selected.


image[25]


Ideally you’ve selected the right one, and after waiting for a minute or two, you’ll see your network in the list. For example, my test network is called lhdevnet, and it’s currently running on channel 6. If you looked closely at the screenshot earlier, you’d see that there are loads of networks in my apartment complex using the same wireless channel.


image


Looks like it’s time to change the channel. Hopefully Futurama is on.


Change Your Wireless Channel


If you’re using a Linksys router, you’ll need to browse to the address of your router, which is probably set to http://192.168.1.1 but could be assigned to another address. You can run a quick ipconfig command at the command prompt to check:


image


In my case the address is different (because I changed it, of course), but what you’re looking for is the Default Gateway for your Wireless connection, and then go to http://<Default Gateway> in your browser. Enter in the password that you hopefully remember, and head to the Wireless –> Basic Wireless Settings tab.


My router has two separate bands, but your router might just have a single band here. In my case, what I’ve done is set the 2.4 GHz band to only be used for Wireless-G, and the 5GHz one to Wireless-N only. Since I’m not having any problems with the Wireless-N settings, I’ve left those on auto.


image


Where I am having a problem, however, is my Wireless-G devices—so what I’ve done is chosen channel 9, since it’s the only channel that’s not being used by any of my neighbors, who are using mostly channels 1 and 6, though a few are using 11 as well.


Channels 1, 6, and 11 are the most common channels to choose, and most routers will use one of them as the default channel—but the general idea is to be as far away from everybody else as you can.


image


Note: I’ve also configured my router for 20 MHz only on the 2.4 GHz Wireless-G band, just because that was the only way it would let me choose the standard channel manually.


If you are using a different router, the IP address will generally be the same, but you’ll have to figure out how to change the Wireless channel without any screenshot tours. It’s usually fairly easy, though, once you know what you’re looking for.


Fun Technical notes


If you look closely, you’ll notice that each of the channels are 5 MHz away from each other, but the Channel Width for 2.4 GHz is actually 20 MHz. What this means is while that the channel might be set to channel 6, it’s also partially using 5 and 7, and probably slightly interfering with 4 and 8.


Monday, July 05, 2010

Penguin United's Eagle Eye brings WASD to your PS3 shooters, disrespect to your enemies (video)

Penguin United's Eagle Eye brings WASD to your PS3 shooters, disrespect to your enemies (video): "
Penguin United's Eagle Eye brings WASD to your PS3 shooters, disrespect to your enemies (video)

With the PS3's plethora of USB ports scattered across the front, you'd think it'd be a no-brainer that all shooters on the console would support keyboard and mouse controls to make the FPS purists happy. Sadly that's not nearly the case, so it's up to companies like Penguin United (creators of a fine array of silly Wii peripherals) to fill the void. The Eagle Eye is its attempt, a surprisingly sizable box with an unfortunately short 2-foot USB cable and inputs for mouse and keyboard. Using buttons on that box you assign controller inputs to keys and away you go, hunting the Helgath's worst in WASD. The cost is a bit steep at $60 when it ships later this month, but nobody said having a (possibly imaginary) unfair advantage over the competition would be cheap.

Continue reading Penguin United's Eagle Eye brings WASD to your PS3 shooters, disrespect to your enemies (video)

Penguin United's Eagle Eye brings WASD to your PS3 shooters, disrespect to your enemies (video) originally appeared on Engadget on Sat, 03 Jul 2010 13:47:00 EDT. Please see our terms for use of feeds.

Permalink | | Email this | Comments


"

The USB Lockpick - Hack Any Password

The USB Lockpick - Hack Any Password: "Forgot your password? Obtained an old computer that was
password-protected? This simple, innocent looking USB drive will erase
any Windows password, allowing you full access to an account. And best
of all, it is 100% free! (assuming you already have an old flash drive)
Note: This Instructable i...
By: BinaryMage

Continue Reading »"

The 100 Buck Photographic Studio

The 100 Buck Photographic Studio: "A couple of my students have asked me to post this article. They have
assembled and used the following lighting arrangements with some great
results. The key to getting good ‘modelling’ from a
photographic lighting set up is to get the light source off the camera,
be able to move its position and...
By: marshon

Continue Reading »"

Google Apps Accounts Will Also Be Personal Google Accounts

Google Apps Accounts Will Also Be Personal Google Accounts: "Lifehacker found an article from Google's help center that explains how Google Apps users will be able to access services that require a Google account.

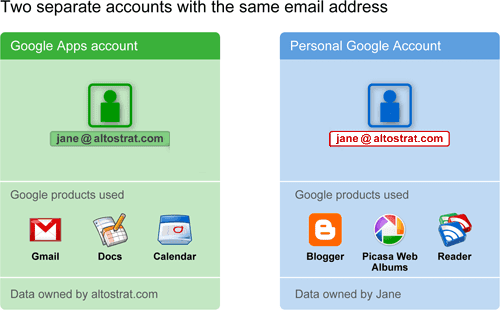
Google will automatically create regular Google accounts for Google Apps addresses like my.name@mydomain.com, so you can use the same credentials to log in to Google Apps services (Gmail, Calendar, Docs) and Google Accounts services (Google Reader, Blogger, Picasa Web Albums).


What happens if a Google Apps user already has a Google account for the same email address? 'For example, your Google Apps email address is email@my-domain.com. A while back, you may have signed up for Blogger with this email address, which created a Google Account. Since we've moved your Google Apps account to a Google Account infrastructure to allow access to all Google products, your other Google Account will be renamed to: email+personal@my-domain.com. You should add the +personal extension to your email address if you'd like to sign in to your old account.'

Google's explanation is confusing and it's not clear why the existing Google accounts won't be migrated. Users will end up with two Google accounts for the same email address and won't be able to merge the accounts.

For now, the integration between Google Apps accounts and Google accounts is only available if you are a Trusted Tester, but Google promised that it will be publicly available in the coming months. 'We intend to have all Standard, Premier and Education Edition customers moved to the new infrastructure that enables this change in the fall, and customers who would like more control over the timing of this change will be able to make the switch voluntarily during the summer.'

{ Thanks, Kevin. }


"

Wednesday, June 30, 2010

Google Docs viewer goes mobile

Google Docs viewer goes mobile: "googledocsWide support for file types, but no editing tools"

Tuesday, June 29, 2010

Creating original cover art for iTunes

Creating original cover art for iTunes: "Always wanted to use your own artwork for iTunes music, movies, and TV files? Chris McVeigh shows you a quick, way to create your own album covers.


"

How to make sturdy umbrella stands for under $15

How to make sturdy umbrella stands for under $15: " In this tutorial I will show you how to make sturdy umbrella stands
for under $15. We recently added a pool and deck to our home and
added some tables with chairs along with umbrellas to the mix. My
concern was the wind, and also what if I wanted to move an umbrella to
provide a little shade w...
By: digeratimvp

Continue Reading »"